How to disable Windows update. How to disable Windows update How to interrupt windows 7 update at startup
Hello, dear readers of the site. Automatically update system files, providing the Windows operating system safety And best performance, a very useful and necessary thing.
After all, system files are not just updated, they are replaced or supplemented with new files that eliminate the found bugs and vulnerabilities used by hackers when hacking computers. Updates are also being written to improve the compatibility of the operating system with computer hardware, which has a positive effect on the overall operation of the computer.
However, due to its intrusiveness, automatic Windows updates are very often annoying, preventing the operating system from loading for a long time at the time of installing updates, or, conversely, you have to wait for some time to turn off the computer, since downloaded updates are being installed at this time.
In this article I will tell you, how to disable automatic updates in Windows 7 and allow it to update and download files only when it is convenient for you.
Windows 7 Update.
Windows 7 Update can be accessed from taskbar or from control panels.
To get from taskbar you need to find in the notification area (lower right corner of the screen) arrow button and click on it with the left mouse button. A window with hidden icons will appear, inside which click on the icon update center:
The Windows Update window will open.

To get from control panels you need to press the button Start" and in the window that opens, find the button " Control Panel» and click on it with the left mouse button.

The window “ Setting up your computer settings", in which you need to find the Windows Update icon and click on it with the mouse.

Selecting a Windows installation method.
To get into the Windows update settings you need to go to the " Control Panel - Home Page» find the line « Settings" and click on it with the mouse.

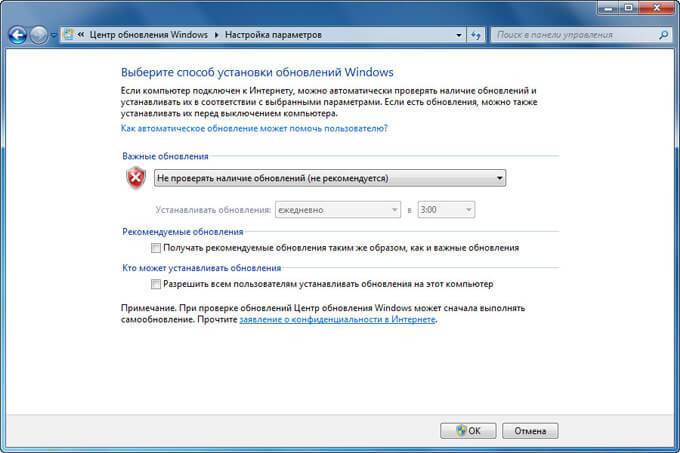
A window will open for selecting methods for installing Windows updates, in which we will make the settings. By default, as shown in the picture below, the operating system will update automatically.

We click on the arrow button and four ways of installing updates that can be specified open up before us.

Very comfortably. The system will find updates, and you will decide for yourself when to download and install them. Place the cursor on the line and click the mouse.


Now the system will only search for updates and offer to install them.
Selecting updates to install.
And one more point worth mentioning.
Sometimes it is useful to see what updates will be installed on your computer. And if any seem unnecessary or undesirable, they can always be excluded from the installation list.

The window “ Selecting updates to install", which provides all the information about the updates being installed. In this window you can see the update itself, its weight, and what it changes or adds.


If you need to remove an unwanted update from the list, then uncheck the box next to it and click the “ OK».

And as usual, watch the video.
That's basically all I wanted to say about disabling automatic updates in Windows 7.
Good luck!
Automatic updates are an important functional feature of any operating system. Thanks to it, the computer receives important updates on time, making the system more stable and secure. In Windows 7, the function is activated initially. This means that if there is a connection with Microsoft servers, the update service checks for the availability of fresh packages, downloads them and installs them. Usually, all processes proceed virtually unnoticed by the user, but when constant offers to upgrade to 10 appear, this is already overkill.
Theoretically, there is no need to disable automatic downloading of updates. It is useful because it closes security gaps, optimizes the operation of the OS, and adds new features to it (regarding the “tens”). There is also a list of reasons why the auto-update service should be disabled:
- The user does not like that during the update the Internet speed drops and/or the PC cannot be turned off for a long time.
- The computer has expensive or limited wireless Internet.
- Problems after launching the updated OS.
- Failures during the installation of update packages.
- There is not enough space on the system volume to accommodate the increase in volume of Windows 7, which grows with each update.
Kinds
Still, before you disable the Windows 7 update, think about whether it is really necessary. In addition to deactivating the service, it can be switched to the following operating modes.
- Fully automatic - operations proceed without user intervention, only notifying the user that the installation of packages is complete.
- Searches and downloads the latest fixes on a schedule, and the installation of packages is carried out by the user.
- Automatic checking and notifying the user about the availability of updates.
- Self-update is disabled. Everything is done manually.
Options are selected in the Update Center component.
Disconnection methods
The settings of any Windows are stored in its registry. You can access the key responsible for the Update Center settings in several simple and a couple more complex ways. Let's look at them all.
Change Update Center settings
Let's start by setting up the service for ourselves. To access the configuration interface, you need to open the “Update Center” using one of the following methods.
System
- Through the context menu of My Computer, call up its “Properties”.
- In the left vertical menu, click on the corresponding link located at the bottom of the window.
- Go to the “Control Panel”.
- Open the “System, Security” section.
- Call the element of the same name.
If control panel items are rendered as icons rather than categories, a link to the item will appear in the main window.
- So, after getting into the desired window, click “Settings parameters”.
- Move to the “Important updates” section and select the appropriate option from the drop-down list.
The only way to completely disable receiving updates on a computer with Windows 7 is to stop the service.
Disabling the service
Management of services in the “seven” occurs through:
- direct editing of registry keys, which is very inconvenient;
- third-party programs for configuring the OS (we’ll skip this option);
- MMC console snap-in;
- system configuration;
- command line;
- Group Policy Editor (present in Windows 7 Ultimate, Enterprise).
Removing a service from autostart
The fastest way to disable updates is through the system configurator.
- Execute “msconfig” in the command interpreter window, which will open after holding down the Win + R keys or clicking on the “Run” button in Start.
- Go to the “Services” tab.
- Find “Windows Update” (maybe Windows Update) and uncheck the box next to it.
- Save the new settings.
Until the end of the current session, the service will work, properly performing the tasks assigned to it. To apply the new configuration, Windows 7 must be rebooted.
Let's use the MMC console snap-in
The system console snap-in of the same name provides access to managing all services on the PC. It starts like this.
- Open the context menu of the “My Computer” directory.
- Call the “Manage” command.
- In the left vertical menu, expand the “Services and Applications” item. Next, click on the “Services” link.
A simpler option for calling the same window would be to run the “services.msc” command through the “Run” dialog.
- Scroll to the very end of the list of services and open the “Properties” of the Windows Update service.
- In the “Startup type” drop-down list, select “Disabled” instead of “Automatic” in order to say goodbye to automatic updates forever. If you need to disable the service now, be sure to click “Stop”. Save the new settings with the “Apply” button and close all windows.
The PC does not need to be rebooted to apply the settings.
Group Policy Editor
Another MMC snap-in called the Local Group Policy Editor will help you configure any system parameter.
It is not available in the home edition of the Seven!
- The tool is launched by running the “gpedit.msc” command through the “Run” window.
- In the “PC Configuration” subsection, expand the “Administrative Templates” branch.
- Open “Windows Components” and look for Update Center.
- On the right side of the window we find a parameter whose name begins with “Setting auto-update”.
- Call up its settings.
- Move the checkbox to the “Disable” position and click “OK” to close the window and save the changes.
Let's use the command line
Through the command line, all the same operations are performed as using the graphical interface, and even more, but in text mode. The main thing is to know their syntax and parameters.
The “cmd” command is responsible for calling the command line.
- Open the command interpreter and execute it.


Before you disable the Windows 7 update, be aware that for all update operations you need to open Windows Update. To do this, click the Start button, select the “Computer” tab and right-click. A menu should appear where you need to select “Properties” and click on it. All that remains is to look in the lower left corner, where the second sub-item will be “Windows Update”.
If you were unable to get into the update center using this method, then for Windows 7 you can try the second option: go to the “Start” menu, go to the “Control Panel”, change the icon display to the “Large icons” mode, and then go to the tab "System".
If this algorithm did not help you, then you can use the simplest option: click on the “Start” button and enter “Update Center” in the search bar and press “Enter”. After a couple of seconds, the search will give you a direct link to the “Update Center”, where you can enter all the necessary edits and settings. For example, if you want to know how to disable updating Windows 7, the easiest way is to go to the “Settings” tab in the update center, select “Do not check for updates (not recommended)” and click “OK”.


As a result, we turned off automatic updates, but for the system this event is, first of all, negative. The first message from the Action Center informs us that changes have been made to the Windows 7 update settings: the flag in the lower right corner begins to loom with a red cross. Now, so that this flag does not annoy our attention, we need to disable this information. To do this, the easiest way is to single-click on the flag icon in the tray and click “Open Support Center”. In the window that appears, look for the sub-item “Support Center Settings” and click. Then all that remains is to uncheck the box next to “Windows Update”.
How to remove Windows 7 update
Many users, after unsuccessful attempts to disable Windows 7 updates, which they believe led to unstable system operation, seek to remove them as soon as possible. Indeed, if the cause of unstable operation or freezes is related to the update, then it is best to remove it. By the way, there is an opinion that such problems will no longer exist in the new operating system. To remove updates, you can use the universal algorithm, which will be given below.
Before disabling the Windows 7 update, call up the Start menu, find the Computer tab and right-click. A pop-up menu should appear, where you need to select “Properties” and click on it. Then all that remains is to look in the lower left corner, where the second sub-item will be “Windows Update”.
Secondly, pay attention to the left tab of the Update Center panel. There should be a "View Update Log" tab. Click on this tab. We will then be able to see all the updates that have ever been installed on the computer, and we will also see their status, importance and installation date.

Some users are concerned about how to disable Windows 7 updates on their computer. Why are users worried about system updates?
Regularly, at certain periods of time (usually once a month), update packages are released for the Windows operating system. Sometimes, if problems arise or vulnerabilities are discovered, emergency patches are released that need to be installed on your computer.
In the Windows 7 operating system, with default settings, automatic updating is enabled. The system periodically downloads and then installs updates and patches released for Windows onto the computer. Most of the updates concern system security.
Users, for various reasons, refuse to install updates for the operating system. Here are some reasons for not receiving Windows 7 updates through Windows Update:
- it happens that after installing updates, Windows or applications malfunction;
- Windows updates often take a long time, during which you cannot turn off the computer;
- with a limited Internet connection, major system updates consume a lot of traffic;
- updates take up space on the PC disk;
- users are afraid of losing their operating system activation after installing updates.
How to disable Windows 7 updates? This issue can be resolved using the system in two ways: disabling automatic Windows 7 updates, or disabling Windows 7 updating completely.
How to disable automatic updates in Windows 7
After turning off automatic updates for Windows 7, the user will still have the option to download and install updates manually.
This is a preferable option than completely disabling the update, since some updates should be installed on your computer in order to avoid becoming a victim of dangerous viruses, for example, .
Go to the Start menu, click on Control Panel, then Windows Update. In the Windows Update window, in the left menu bar, click on the “Customize settings” link.
In the “Settings” window, in the “Important updates” option, select “Do not check for updates (not recommended)”, and then click on the “OK” button.
Additionally, you can uncheck the two settings below: “Recommended updates” and “Who can install updates.”
In the future, if you need to install updates manually, in the “Important updates” setting, select “Search for updates, but I make the decision to download and install.” Next, after you've finished searching for available updates, select the updates you want to install on your computer.
How to disable Windows 7 update permanently
The second method disables the Windows Update service on your computer, so checking for updates will be disabled.
Go to the Start menu, then go to Control Panel => Administrative Tools. In the “Administration” window, double-click with the left mouse button on the “Services” shortcut.

In the “Services” window, in the list of operating system services, find the “Windows Update” service, and then right-click on the service and select “Properties” in the context menu that opens.

In the “Properties: Windows Update (Local Computer)” window, in the “General” tab, select the startup type: “Disabled”, click on the “Stop” button to stop the service at a given time.

You can re-enable the update in Windows 7 using the same method. In the “Properties: Windows Update (Local Computer)” window, select the startup type: “Automatic (Delayed Start)”, and then click on the “Run” button.
Disable Update Center on the command line
You can disable Update Center on the command line, follow these instructions:
- Run Command Prompt as Administrator.
- Enter the commands sequentially (after entering the command, press the “Enter” key):

After this, the update service and Windows Update will be disabled.
Disable automatic Windows updates in Windows Update Blocker
You can use the free Windows Update Blocker program to disable the automatic operating system update service. The Windows Update Blocker program supports the Russian interface language, the application works without installation on your computer.
Download the program from the official website of the developer, known for a large number of other popular programs.
Windows Update Blocker download
- Unzip the ZIP archive to a convenient location on your computer.
- Open the “Wub” folder, launch the “Wub.exe” application.
- In the Windows Update Blocker program window, activate the “Disable Updates” radio button; in the “Protect Service Settings” item, the checkbox will automatically turn on.
- Click the Apply button to enable the options.

- The Windows Update automatic update service will be disabled.

The user can check the service status status using the Menu button. Select the entry options for “Windows Update” and “Windows Services” in the context menu and look at the result.
Conclusions of the article
If necessary, the user can independently disable updates in the Windows 7 operating system by disabling updates completely, or disable automatic Windows updates using system tools, or in the Windows Update Blocker program.
How to disable Windows updates in Windows Update Blocker (video)
Of course, the windows update service is an important and necessary thing, for example, to enhance the protection of the operating system, service files or user files from attacks by viruses and hackers. Often, through this service, developers install program code into the operating system that corrects errors they have made that were not identified during the development and testing stage. Let's look at two ways below to cancel a Windows 7 update.
How to cancel Windows 7 update yourself
Mostly, users refuse to receive updates for the following reasons:
— the occurrence of critical errors after changing service files, which lead to system inoperability.
— reduction of hard drive space due to the installation of more and more new improvements. This is relevant for owners of laptops and tablets with a small SSD.
— drop in Internet speed due to loading.
— long time to turn off/on the computer during installation.
— users of pirated versions of Windows 7 may encounter restrictions on the functioning of the system if the legitimacy of the license is verified.
Stopping the service responsible for updating Windows 7
In order to completely stop the process, run: “Start” - “Control Panel” - “Administration” - “Services”. Find the Windows Update service and go to it.
Set the startup type to “Disabled” in the window that opens. Then click the “Stop” and “Apply” buttons.

You can close the windows - the process is stopped.
Cancel windows update via Explorer
This is not as drastic a method as the first one. Execute: “Start” - “Control Panel” - “Windows Update”. In the window that opens, select “Settings”.

In the new window, in the “Important updates” section, set: “Do not check for... (not recommended)” and uncheck all the checkboxes below to cancel. If necessary, you can launch the functionality manually by clicking the “Check for updates” button.

If necessary, you can manually install updates by clicking the button "Check for updates".
Rolling back Windows 7 updates
In conclusion, we note that incorrect updates that interfere with the operation of the operating system can be removed by returning to the state prior to the changes made. Execute “Start” - “Accessories” - “System Tools” - “System Restore”.

Select the desired restore point and click Further.

System restore takes some time; you must wait for it to complete. This way you can undo the changes and return to the original state.